Monday, June 3, 2013

Pebble Smartwatch


So I got my Pebble Smartwatch from a friend recently and have been playing with it for a day or two.


I already threw away the box it shipped in but it was in a nice clean box...  Nothing exceptional.  It came with a usb charging cable that magnetically attaches to the left side of the watch.  It came with a slight charge, but it needed to fully charge another couple of hours.  

Overall, the watch feels nice, its not too heavy or light.  


One of the various watch faces that come preinstalled on the watch.  There aren't many apps yet available for the Pebble on the ios platform but it seems the community is pretty excited about the watch.  You can download an SDK to create your own stuff too!


 On the iPhone, you have to download the Pebble app from the appstore and turn on your Bluetooth connection on your phone to pair them together.  Instructions were pretty straightforward.  Load the app, pair the watch, and you are good to go.


If you just got you watch, you might need to update it.  


You can add new watchfaces via the app.  If you want to download new faces, you just need to download it to your phone and the app will allow you to load it onto your watch.

Having the Pebble makes it much easier for me to weed out text messages and notifications that I was getting on my phone.  Now I can keep my phone in my pocket while I get texts and email notifications on my watch.  

I'm very excited to see what developers have in store for Pebble (or any smartwatches) users.  Visit http://www.getpebble.com for more information.

Thursday, May 23, 2013

Homemade Flavored Mixed Nuts

So I was bored one night while eating some mixed nuts and I thought they tasted bland.  I decided that I would try and add seasoning to it.  I went to the cupboard and started mixing random seasoning that I thought would taste great together, mixed them with the nuts and tried tasting them.  To my dismay, the flavoring didn't really stick to the food.  This is what I did to try and correct that problem.


1.  I put all the seasoning into a small pan.  If I remember correctly, this was Italian seasoning, black pepper, garlic salt, and some habanero powdered seasoning from a vendor in Hilo.


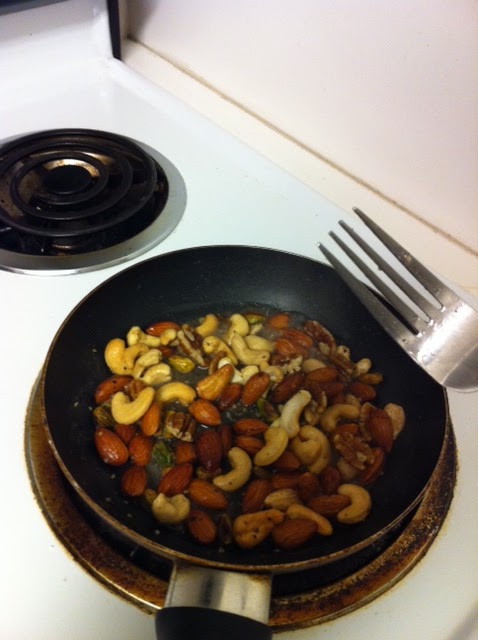
2.  I added some water and mixed the seasoning together, added the mixed nuts and let the water reduce while I stirred.  I wanted to use vegetable oil, but I couldn't find any.


3.  I then put the concoction in a oven safe pan and let it bake for about 10 minutes at about 300 degrees.


4.  This is the finished product.  I should've left it in the oven for about 5-10 more minutes but it was getting late and I was worried that I was going to burn it.  Maybe next time I will use my air convection oven so that I can keep an eye on the mixed nuts while I watch TV.

The flavoring stuck to the mixed nuts and it now had taste.  I didn't give it a full taste test as I was tired already and went to bed but I had a couple of pieces and it was much better than it was before this experiment.  Next time, I will try using oil, or maybe butter!

Thursday, March 21, 2013

Time to code!

I have always liked technology.  I remember when I was in Elementary school, I got to play with the Apple IIe computers and played a Lemonade Stand game.  It was awesome.

When I was in the 6th or 7th grade, I took a class in Logo (http://en.wikipedia.org/wiki/Logo_(programming_language) and I was hooked.  BTW - this was one of the best things I have ever done in my life and I suggest anyone with kids to enroll them in some sort of introductory programming or computing class.

My parents later got me a Commodore 64.  There used to be books that you could buy that was filled with programs that you could type into the Commodore.  I would type away and eventually run the programs.  Some would work, some would fail.

I remember Radio Shack used to sell a Tandy computer that they displayed in front of their store.  Whenever my parents took me to the mall, first thing I would do would be to write a simple infinite loop on the machine and run it.  Later I would see if the employees at the store figured out how to stop my little script.

10 CLS
20 ? "Hello!!!!!"
30 GOTO 20

For some reason, I stopped playing with computers or technology for a while after that.  

I am much older now and I have been getting the itch to program again.  Did some research and looking at doing some Python programming to get my feet wet.  

Here is the thing though - 

I have always looked at programming as a structured thing.  But if it is so structured, why aren't there a set of projects that all programmers do that test your ability to write in each type of language?  We all know that the first thing you create is a "Hello World!" program but what is next?  Game of Life?  Connect Four?  And what program would be the holy grail of programs that (if you reach that level) defines you as a master of that language?  

Anyway, if I'm not embarrassed by my progress, I will post what I learn here.  

I urge anyone who touches a computer to understand programming.  Visit http://www.code.org for information about programming.

Wednesday, February 20, 2013

Won Ton Pizza

I had some Won Ton wrappers in my refrigerator and I wanted to use them.  Of course, I didn't want to make regular Won Ton.

So....  WON TON PIZZA it is!

First, I brought the Won Ton wrappers to room temperature.  While I was waiting, I cooked some chicken and some smoked pork I had left over in my freezer and mixed them together.

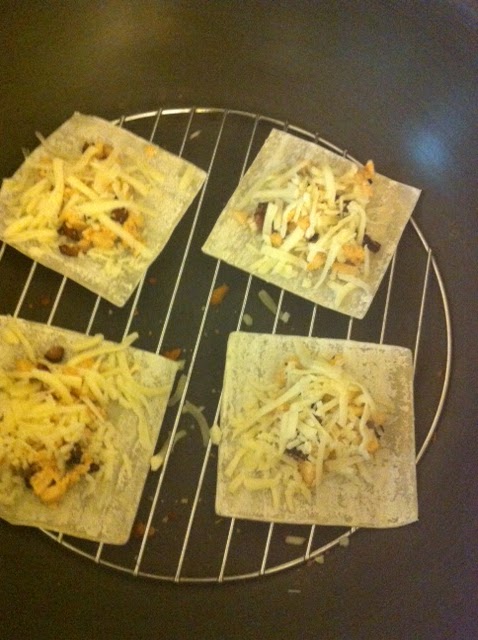
After the wrappers were at room temperature they were placed on the grill.


I added cheese and my chicken/pork mixture that was made earlier.


It was then cooked at 350 for a few minutes in our trusty convection air oven.  It was done when the wrapper was a golden brown.  

(When I did my first batch, I placed foil on the grill but the bottom of the wrapper didn't cook well.  So I took the foil off and it cooked more evently.)


Here is the finished product.  I was low on cheese so if I were to do it again, I would add a lot more cheese to it.

Tuesday, February 12, 2013

Papermodel websites

So if you are bored, too lazy to go out and buy stuff for your new project, and have access to a computer/printer, I have a cool time killer for you...  Papermodels.

The internet has allowed us to do more from our homes than before.  Remember buying those papermodel books where you cut out pieces and glue or tape them together to make cool items?  Now you can just download the pictures and go straight to work!  No need to go to the store anymore.

1.  Yamaha Paper Crafts - http://www.yamaha-motor.co.jp/global/entertainment/papercraft/
Probably one of my all time favorite papermodel websites is the Yamaha paper crafts website.  This one has been around for a while and they have some really fun stuff.  You can do animals, scenes, greeting cards, and motorcycles (of course).  They are pretty well detailed.

2.  Corolla AE86 - http://ginreimokei.blog.fc2.com/blog-entry-109.html
One of the first papermodels I ever did was an ae86 model that I randomly found on the internet.  There have been many iterations of these and this is just one of them.

3.  Canon Creative Park - http://cp.c-ij.com/en/contents/1006/
Similar to the Yamaha site, this one features really nice papermodels with really good detail.  Check it out and impress your friends.

4.  Paper Robots - http://www.paperrobots1999.com/home.html
Awesome site for the papermodel fan and the robot fan.  If you like stuff like transformers and you like paper cuts, the smell of glue, and impressing your friends with a model you made but someone else engineered, this is the site for you.

There are many many more sites out there that you can visit.  There has been a few days where I would spend hours looking for the right model to do only to find out I had spent an hour or two just looking.  By then, I didn't have time to actually build the model.  Still, the detail and the work put into creating these are awesome!

Tuesday, December 25, 2012

Aftermarket Steering Wheel

The original steering wheel on the USDM 1985 Toyota Corolla GTS is non-sporty.  It is thin, flimsy feeling, and feels commuter.  An easy mod is installing an aftermarket steering wheel.

Unfortunately, I forgot to take a picture of the OEM steering wheel.  You can google it though.

The things that I used to do the swap were:  steering wheel, wheel adapter, and wheel spacer.  In addition, I had to use an allen wrench (included with the spacer that I bought), a 19mm socket, various extensions, and a ratchet (or breaker bar).


I initially installed this wheel without a wheel spacer and it was way too close to the turn signal.  


To remove the wheel I had to remove the horn cover (you can see it partially remove in the above picture).  The OEM wheel also has a horn cover that you have to remove as well.  Under the cover is the horn.  I had to remove that as well.  (I don't remember for sure, but I don't think there is a separate horn on the OEM wheel.  I think its built into the horn cover.)

--Sorry I forgot to take pics of this part.
The wheel is held onto the steering rack with a 19mm nut.  I used a breaker bar with one hand and I used my other hand to hold the wheel to remove the nut.  The proper procedure to remove the wheel is to use a steering wheel puller.  I don't have one so I just jiggled the wheel free.


These are the parts I used to make the swap.


Left is the wheel, center is the spacer, right is the adapter.

The adapter you use is specific to the wheel you use. Make sure you check before buying.  I know Grant Steering Wheels are different from Personal/Nardi Wheel adapters.


I'm not 100% sure if all spacers are the same, but I noticed the one I bought had castings on one side of the spacer.  I placed that side up (facing the wheel) when putting it together.

My wheel's horn had a metal ring that is placed in the adapter or spacer to tighten up the fit.  You can see it protruding in this picture.  

The wire sticking out of the adapter/spacer is the horn wire.


This is a picture showing the inside of the wheel adapter and the wire for the horn.  On the back of the horn button is a male adapter for that wire.  It is a pretty straightforward installation.


This is the wheel all put together.  You use allen bolts to connect the wheel on top, spacer in the middle, and adapter at the bottom.  


This is the wheel installed.  Installation is the reverse of removing.  Some hints.  You will notice there are notches in the back of the wheel adapter that correspond to orientation that it is installed in the car.  There are two raised bumps in the area of the steering shaft and a plastic piece as well.  The plastic piece is associated with the turn signal.  If the wheel is installed wrong, the turn signal might not work properly or the wheel might not be aligned properly.  If that happens, just remove the wheel and reinstall.

The distance between the wheel and the turn signal is more comfortable now.  The driving position feels better as well.

I would recommend reading your installation or car's manual prior to installing your wheel.  Different cars might have different procedures.  Even different steering wheels will be different (ie:  OEM, Aftermarket, airbag wheels, etc).  

Enjoy your aftermarket steering wheel!

Monday, April 23, 2012

Homemade Pedialyte

I recently heard from a friend that a good way to rehydrate yourself is via Pedialyte. I bought a bottle at the store and liked the taste but the price was a little high for something that I wanted to add regularly to my diet.

I did some research and I found a really great site that had a couple of recipes for homemade pedialyte (http://www.ourlittlemonkeys.net/2010/01/26/homemade-pedialyte/).

I gathered the bits to make the solution.
Water, baking soda, sugar, salt, and flavoring.

I doubled up the recipe from http://www.ourlittlemonkeys.net.

I used 8 cups of water and added 1 Tsp Baking soda.

I then added 6 Tbsp Sugar.

Next I added 1 Tsp of Salt.

I mixed it and refrigerated it.

And here is the finished product!

I did read that drinking Pedialyte might be a little extreme and it should be done in moderation so I am trying to watch for any weird reactions. The taste isn't what I expected as the Pedialyte I bought in the store was more tasty. It could be the flavoring packet that I had used though.